Hoisting the main
Due to the design of the gaff batten, which is permanently fitted in the sail at the 2nd top car, it can be difficult to attach the head of the sail to the headboard car before hoisting. You need to be able to pull the head close enough to the headboard car to shackle it on, and that means going to the mast and trying to reach it and pull it in by hand. Leaving it attached is not practical as too much of the sail would stick out of the lazy bag when the sail is down. As a result each time you hoist the main “someone” (usually Keith) has to go up to the mast as the main is being hoisted and perform the tricky manouevre of bringing the ring on the head of the sail close enough to the car to attach it. Even at the towering height of 5’ 10” (Keith thinks that this Towering) this is never easy and can be dangerous in rough conditions.
FP can supply a ‘Karver’ hook fitting at a cost of around €500! While this will solve the issue (as money often does) There are a couple of much cheaper DIY options available to make this easier.
On our Lipari (FP 41’) Keith attached a short length of 3mm Spectra to the top batten car that he threaded through the ring in the head of the sail and back to the top batten car to enable him to pull the sail close enough to attach the snap shackle by hand. In itself quite a challenge particularly in a bit of swell. On the Helia (FP 44’) this was not really an option as the main had to be hoisted too high before the head and the car could be brought close enough to attach the shackle, making it near impossible for a normal height human to reach. (Lynda is 5'2", nearly normal human height)
Thanks to Cote Mar, active and knowledgeable contributor to the FaceBook FP Owners group, and guru of all things Helia, for his “hoist aid” suggestion which we have implemented. This solution means the main can be hoisted (almost) completely from the helm station. While we still have the challenge of keeping the head and battens from getting caught in the lazy-jacks and on the boom topping lift on the way up, at least no one needs to go to the mast.
So to set up the permanent “hoist aid” we use a 6mm spectra line that is attached (tied) to the gaff batten car (by Keith's thumb), run through the snap shackle on the headboard car, through the ring at the head of the main, and attached (tied) back to snap shackle on the top car (Picture 1) The length of the cord is important. It needs to be the length of the distance between the 2 top batten cars plus a bit extra for the knots (picture 2). You will probably need to play around with it and adjust it: too long and the sail will not get close enough to the mast and fall away at the head, too short and you will loose luff tension. (Note the snap-shackle on the headboard car has since been removed and replaced with a sheave, should be smoother in theory but in practice... Hmmm jury is out)
The beauty of this solution is its simplicity. As the sail is hoisted and the luff tightens, the cord pulls the head closer and closer to the top car and the mast. Note that it does not attach the main to the car, but the tension will be sufficient to keep it in place, close enough in. As the main comes down of course the reverse happens. How cool is that! Not something you would do on a race yacht, but works perfectly fine for cruising. Note that when the main is down we keep the main halyard attached to the head of the sail permanently and run a short line from the halyard back to the base of a jackstay to eliminate 'Halyard slap'
The photos will hopefully make this a whole lot clearer.
Reefing system
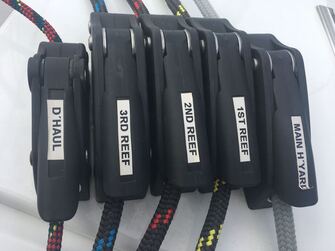
 Reef downhaul jammer on the left
The first reef on the Helia is a continuous line which is great because no-one needs to go to the mast to attach the luff downhaul. Whilst we were on the FP dock at La Rochelle an experienced delivery skipper beside us mentioned that the first reef is subject to chafe and predicted that we would lose it after the first use! Well he was right about the chafe but fortunately we didn't lose it. Keith moved it along but it needs monitoring regularly! Our friendly rigger who was a guest in our first season (thanks Mr Messo), had a look advised us to realigned the way this line was feeding through the eyelet to the sheave in the boom, so it was not coming back over itself. This has improved but not eliminated the chafe. We check it continuously and keep moving the line away from the chafe point. This shortens it though and we are fast running out of reefline! It has now been replaced by Dynalite so we can start again!
The 2nd and 3rd reefs lines are only on the leach, with the intention that you manually pull the luff down and put the pennant through the reef eyelet and shackle it at the base of the mast. This can be challenging and dangerous in a blow when there is a good deal of pressure in the sail. We had Uchimata install an extra jammer on the coachhouse for a reef downhaul on the luff of the main. We hook this into either the 2nd or 3rd reef and it allows us to winch the sail down at the luff and get it quite tight. It works a treat, as no-one needs to go up to the mast in a blow to pull the sail down, when it is quite dangerous.
The 2nd and 3rd reefs lines are only on the leach, with the intention that you manually pull the luff down and put the pennant through the reef eyelet and shackle it at the base of the mast. This can be challenging and dangerous in a blow when there is a good deal of pressure in the sail. We had Uchimata install an extra jammer on the coachhouse for a reef downhaul on the luff of the main. We hook this into either the 2nd or 3rd reef and it allows us to winch the sail down at the luff and get it quite tight. It works a treat, as no-one needs to go up to the mast in a blow to pull the sail down, when it is quite dangerous.
Additional Modifications
Halyards supplied by the factory are 12mm and not the greatest quality. They don't run well through the sheaves at the masthead or the jammers making the mainsail slow to drop. Someone does need to go to the mast to pull the luff down while the halyard is fed through the cleats. We have now replaced the main halyard, along with the first (continuous) reefline, with 10mm dyneema (Dynalite to be precise), which are still compatible with the existing jammers and runs much more smoothly.
As we have no room for a deflector or deck organiser to get a better angle for the lines to lead into the jammers and winches we have swapped the he position of the main halyard and the first reef in the jammers. This will give a better angle for the main halyard to the mast as well as back to the winch so again it helps it run a little more smoothly.
As we have no room for a deflector or deck organiser to get a better angle for the lines to lead into the jammers and winches we have swapped the he position of the main halyard and the first reef in the jammers. This will give a better angle for the main halyard to the mast as well as back to the winch so again it helps it run a little more smoothly.
|
Batten cars
We have installed 3 more cars on the main to stop it billowing out when it is raising and lowering. You can see the pink lacing in the photos. These are placed between existing battens. One of these is laced to the 2nd reef eyelet and the others in eyelets we had added between the battens. They are not load bearing. Meanwhile to ensure the cars run smoothly we have removed one ball bearing from the back of each car. Also a little "one drop" (Harken lubricant) can be applied to keep things running smoothly. We have been really pleased with these changes as it makes the main easier to control when hoisting and lowering as well as reefing, as it definitely stops a large amount of sail from billowing out. |
 Shock cord through the centre of the pulleys
Mainsheet blocks
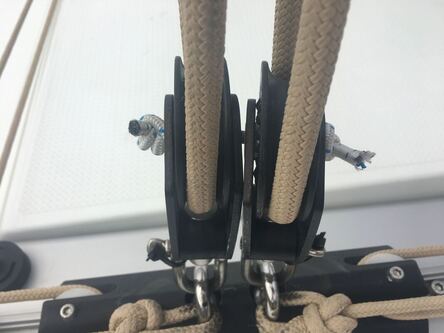
Another small tip we got from our rigger friend Mr Messo was to put some shock cord through the blocks of the mainsheet at the traveller. This simple measure stops them from twisting and getting stuck. If you look closely you will also see another neat idea - cable ties through the heads of the shackle pins and looped through the ring on of the block. This stops your pins from working loose and being lost.


